Friday, March 11, 2011

creative friday...

oh my! aren't we behind...


well, in my defense it is nearing spring! that means garden on the brain & planning/organizing our spring (homeschool) co-op session, along with both running a home & an etsy shop...

busy bees...but then who isn't, really??

@ any rate here on some of the lovelies that i've been working on lately...(as in the past 2-3 weeks!;)

another round of felted soaps...
this one to appease the merfolk...:)
(inspired by a gratitude soap i am making for a lovely lady whom i have never acutally met, but has nonetheless been a blessing in our lives)

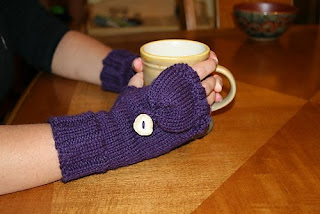
a pair of copy cat cobalt convertible mitts for another sweet mama, and project #4 of "pay if forward 2011"...
stylin', profilin'... and the pattern, my own pattern, is on ravelry... !!

super cool, fun & practical to boot...!
we'll be using ours both in the garden & beyond (soccer games, when headed to the park, bike rides, walks, etc...the list is endless.)
"oceans & seas"...a super cute basketweave headband for another bits of goodness swap, this one was a specialty swap (aka one-on-one w/another mama) she asked me to knit a couple of headbands for her daughter, who is 6 years old & LOVES green.

& she'll be making evyn a couple of twirly skirts...gotta love that!
(modeled by aydin...he's got his papa's dimples ;)
i did add a couple of inches onto the pattern (so 15" long vs 12"), as it was originally sized to fit a toddler.
it has i-cord ties to get that perfect fit...i hope she loves it!
more water bottle totes...making 7 in all...

5 for the swap & 2 for our family. :)

modeled by our 10 year old, orin... notice the hip-ness of it all, while encouraging eco-consciousness. lovely!

a washcloth/dish rag for papa. "i love you" in sign language, though i hard time capturing it on camera...
i knit this up one night as an apology & an "i love you!" all rolled into one...

we had a little spat before he left for work, as most couples do on occasion. ours have actually become amazingly few & far between.
@ any rate he works LONG/odd hours & sometimes i just want him here with us. (is that so wrong??)

i know, "things are as they should be", but that doesn't mean we have to like it...
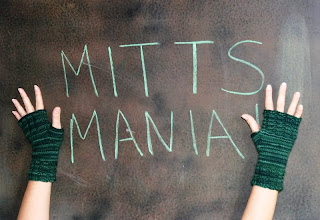
"green with envy", more fingerless mitts...


these are a gratitude gift for our kith & kin leader, miss rosie. she is an amazing life force in our community & always welcomes the children with open arms, no matter how long between visits. we LOVE her!!
"babe-a-licious blue mitts"...convertible mitts for a dear friend, miss katie watkins...

modeled by my super cool sister, sammi...gotta love these!
a cool clay cat made by orin (10); he chills a top our telephone...;)

evyn, painting wet-on-wet watercolors...

a card for grandma...
"creamsicle" slouchy hat & scarf set, for a dear family friend...

the hat...
the scarf...(i LOVE this picture!! just a taste of what sk brings to our house! ;)

perfect for your noggin'...
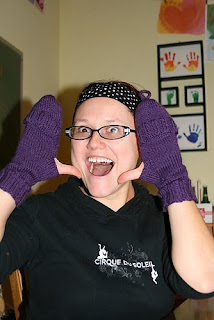
and beaner beans, 4, modeling a pair of pink-a-licious scrappy mitts...

project #3 for "pay it forward 2011"...

i am really want to make more of these, they turned out great! & a perfectly lovely way to use up those little yarn niblets.
actually, our nephew's birthday is coming up in a couple of weeks, i think i'll make him a pair in red/orange...
happy creative friday to one & all!!

Wednesday, March 2, 2011

*free pattern* convertible fingerless mitts...

after making about a million pairs of these mitts, i began to get requests for convertible mitts

so, i sat down & figured it out & after a fair bit of tweaking, a star was born (tee, hee :)
@ any rate, here is the pattern, enjoy!!!


easy peasy rice & cheezy convertible fingerless mitts
(based on easy fingerless mitts by maggie smith)
Materials:
*about 140 yds worsted weight yarn
*size Us #6 double point needles
*3 stitch markers
*2 buttons (for the flaps)

sized to fit average women's hands
(can use size #5 needles for a smaller hand/tighter fit or use #7 for a man's hand)

Abbreviations:
CO, cast on
PM, place marker
BO, bind off
Dec, decrease
k2tog, knit 2 stitches together

guage: 6 sts & 8 rows = 1 inch

Cuff:
CO 36 sts, PM & join into a round. K2, P2 for 2".
begin knitting in stockinette, continue until you have 1.5" (measuring from top/end of ribbing)
Thumb shaping:
round 1. k2, increase in next stitch, PM, k to last 3 sts of round, PM, increase in next stitch, k2 (38 stitches)

round 2. knit around plain.
round 3. knit to one stitch before increase marker, increase in next stitch, slip marker, work to second marker, slip marker, increase in next stitch, knit to end (40 stitches)
round 4. knit around plain.

repeat rounds 3 & 4 until there are 50 sts.
on last plain round, knit around to last increase marker, remover marker, knit 3 sts, then begin BO.
BO 14 sts. knit in stockinette for another 2" then BO all stitches, using a needle the next size up.
For the flap:
pick up half the number of sts that you originally cast on
(for this pattern i CO on 36 sts to begin with, so i picked up 18 sts) for the flap. which side you pick up sts from depends on whether you are making the right or the left mitt.
knit those sts. then using the simple cast on method, CO that same number of sts (for me that was another 18 sts) & join for knitting in the round.
knit 2" in stockinette, or long enough to meet the tips of your fingers.

Begin decreases:
round 1, dec k2tog (18 sts)
round 2, dec k2tog (9 sts)
break yarn, leaving an 18-24" tail, weave through remaining sts & tie off
(DO NOT weave in ends as you will be using this tail to knit your i-cord button loop)


I-Cord button loop:

pick up 2 sts @ the very tip of the mitt
use 'tail' to knit a 2 stitch i-cord long enough to form a loop for your button (mine were large, 1" buttons...so i knit 15 rows)
tie off i-cord & sew to top of mitt forming a loop for your chosen button.
Flap ribbing:
pick up half the number of sts that were CO from front (open side) of flap, along with 1 additional stitch from each side (again, i originally CO 36 stitches, so i picked up 18 sts, 20 sts total).

attach yarn leaving a 6" tail (this will later be used to sew the flap ribbing to the side of your mitt).
knit FLAT in K2P2 ribbing for 8 rows, bind off loosely in the rib. secure, leaving a 6" tail.
this will form a row of 3/4" ribbing @ the base of flap. once bound off, align & sew to sides of mitt.
(this will ensure that the flap stays in place while in use :)

sew on button where appropriate...

now put on your mitts & go show off your mad skills, or...


knit ANOTHER pair! ;)
(please let me know if there are mistakes or any bits that are unclear :)

happy knitting!! xoxo