Showing posts with label woodworking. Show all posts

Wednesday, February 6, 2013

baker's dozen update...

so, you may remember my post about the "baker's dozen"...my goal for the year (2013) to make  *13* 1) food items & 2) household items this year that i/we would normally go out & buy.

this is surprisingly easy & FUN!!  the only "hard part" is deciding what to do next!! 

first up, an update on our WOOL DRYER BALLS (aka HOUSEHOLD ITEM #1)

these are the ones made from yarn leftovers....
 

it's hard to tell in the photo, but they are thoroughly felted...it took ~6 goes in the wash.  so, pretty much a week's worth of laundry @ our house. ;)


these are the wool batting ones...ehren, ev, & i wet felted them, then tossed them in the wash to really tighten them up.
 
we have been using these since the middle of january & they are AWESOME!!!  they really do help absorb the moisture, allowing our clothes to dry quicker & they suck up all the static.  love *LOVE* love these!!!
 
for FOOD ITEM #2, we have started making our own FRENCH FRIES
 
for our first go, we fried them up in our cast iron skillet.
 
be warned!!  they take a good 20 min or so *per batch* (lance blames is on our stove, says it doesn't get the oil hot enough), but my friend confirms that they really do take a while to make.
 
sooooo good though!
 
for our second go, we baked some in the over.  they didn't turn our so hot.  i might scope around online to see what i should have done differently. 
 
i just cut them into 1/4" strips, tossed them in some oil, salt & pepper & baked @ 450 until they were done, ~30 min.  most didn't turn out as crispy as we would have like & the ones that did were totally dried out inside. :(
 
never fear, we'll keep hunting (or) if you have mastered this art, PLEASE do share!!!
 
HOUSEHOLD ITEM #3, CHILDREN'S DRESS UP CLOTHES RACK
 
this was so much fun to make...  i really do LOVE woodworking, and was excited to be doing a project that didn't involve *yarn*!!
 
background...our littles share a room & each had their own (rather large) basket of dress-up clothes.  we recently painted their room & ended up going through things then too.  there were so many sweet/awesome/cool get ups that i hadn't seen in a while.  they both wanted (of course!) to keep *everything*. 
 
so, i wanted to work out some sort of setup that would allow them to keep everything, but keep anything from being buried under a heap.  after a quick google search for wooden clothes rack, i came upon this...
 
i asked the kids, they loved it!!  they loved the box @ the bottom, which is perfect for shoes, jewels, belts, hats, etc...

with this as my inspiration, i set to work measuring & hunting around for picture idea...something that would work for both a boy & a girl.

i found some cool clip art owls on etsy & had each pick out his/her favorite to make their side of the "accessory" box.  unfortunately i cannot locate the right shop now :(


the sides were inspired by decorartist's sweet bird designs...


it turned out so stinkin cute!!!!

i have to admit that i haven't done too many woodworking projects & though this was relatively simple, i was extremely nervous when it came time to assemble (aka, the "moment of truth").  it all worked out perfectly though!!! 

& their rooms looks simply smashing!!!

and what lovelies have *you* been crafting??????  xo

Tuesday, August 30, 2011

handmade goodness & no, not all of the knit variety...;)

as i mentioned in my last post, we are currently knee deep in homeschooling & lovin' it!
for one thing, it gives me an outlet to do all the projects & try all the cool recipes that i clip out of magazines... ;)

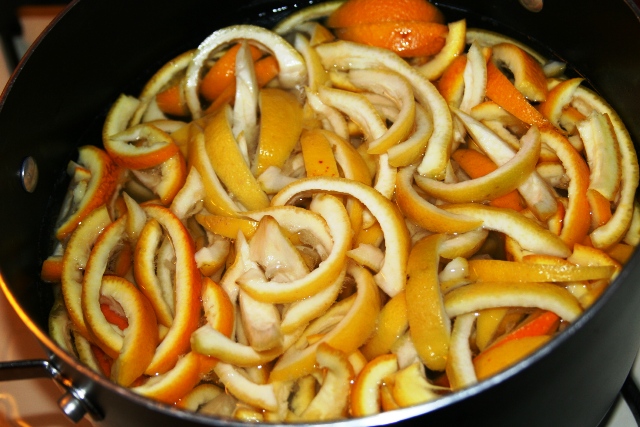
last week, for baking day we wanted to make come candied lemon & orange peels.  well, you eat the oranges of course, but then how to get to the lemon peels w/out wasting the 'meat'.  orin's bright idea was to make lemonade!

so, homemade lemonade it was...


while the boys were mixing up the lemonade, i started on the candied orange & lemon peels...
first you boil them for a good 20 min or so...


we didn't really go for the lemon peels, but the orange peels were delish! ;)

*side note: i rolled them in sugar, as directed, but then brushed them off a bit.  perfect!*

for our handwork project, we made a super cool bug house/critter cage.

i had a few pages from magazines & books, but none seemed right for us.  we wanted one that we could keep out caterpillars & crickets in, but that would also house the toads & other smallish critters that frequent our yard.

so, we winged it...

using some scrap wood, a bit of metal screening that we had leftover from another project & a few hooks...  the boys LOVE it, but now they each want their own! 


our first 'resident' the eastern tent caterpillar...

looks like we'll be making 3 more this week, along with a couple extras for a few friends whose birthdays are coming up. ;)

now for the craftiness...

this lot i call 'a taste of honey', as that is what this colorway reminds me of... 

also working on a 'pebble' in this colorway...

here are the 'everyday gray' mini mitts i mentioned in my last post...

all of those are for the 'heritage festival' coming up october 1st.

next i had a custom order from *my mom*! ;) she requested another waldorf ball & doll gift set for a friend's baby shower...

and lastly, i had another custom order this week from a local mama.  she requested a custom set of eco-friendly, kid sized napkins for each of her daughters. 


they attend public school & bring *waste free* lunches each day.  she thought that a set of reusable cloth napkins would be the cherry on top!

each napkin is made from upcycled fabrics which makes for a ooak (on of a kind) set, as well as an even greater "ode to mother earth"...

each napkin measures ~7sq" & is made from either 100% cotton (or) a cotton/linen blend.

and what lovelies have you been working on this week??

xo

Sunday, August 28, 2011

recent creative endevors...

august arrived & everything got amazingly busy, super fast!   i've been wanting to post more regularly, but honestly there are just NOT enough hours in a day to do all the things that i need/want to do.  so... we'll have to settle for random bits of goodness. ;)
the madison county heritage festival is coming up the first saturday in october & sammi (my sister) & i are working hard to stock up knit & hand sewn lovelies for our table. 

i was keeping the shop updated as well, but everything kept selling!  this is normally a good thing, but not as we are trying to have a *full table*!
i recently had an order for this knit vest... 

sized to fit a 3-4 yr old...
well, i ordered 2 skeins of paton's classic wool. the colorway is light gray mix.  it is such a perfect, everyday gray that i wanted to make a more manly vest with it as well. 
like this one...
not only did i have enough yarn for this sweet vest, but i had enough left over to make a pair of mini mitts as well!

i made a lot of these water bottle for a swap this past spring.  i also made a few extras for our family.  ever since then, ehren & evyn have been wanting their own totes.  so, i took a few days & got their "wish list" done.  well @ least part of it, they always seem to have a list of t hings for me to make/do.  it is good job security though, right?? ;)

both are 100% cotton.  ehren's is pisgah yarns peaches n' cream, 'fiesta' colorway.

and ev's is lily's, sugar n'cream, 'hot pink' colorway
i also had a few custom order soaps for the shop. the first is a serene woodland scene...
the second is for an early christmas order. her son LOVES all things wizard of oz, so i went with the dvd cover art as inspiration.


tuesday is handwork day, part of our homeschool day.  this week we made a step stool for the littles, though we have ALL used it for various tasks.
we had a simple, plastic step stool for many years, well for 10 years to be exact.  a few weeks back one of the legs cracked & instead of buying a new one, i called my dad. 

he & my older brother built one when i was a little girl that is still used to his day.  you know it is a good design when it has stood the test of time for nearly 30 years, right??  so, i got the dimensions for it & set off to look in our scrap wood pile to see what leftovers bits we had that could be sued to make a similar model. 

the original was made out with poplar 1x8's as that is what they had one hand.  we however, had nothing that fit that bill.  we did have some 3/4" hardwood plywood that was leftover from a tv shelf that lance built a few months back. 

we had to modify things a bit, but for the most part is it the same size as the original (16" long x 8" wide & 6" high)

there are 2 cross bars, made with 2x2's.  one is set off to the left & @ the top of the stool & the other is set off to the right & @ the bottom of the stool

we also used a drill bit the same size as the screw heads, frilled down 1/8" or so, so that the screws would be set in to the top piece.  a *bonus* tip from my dad.

other tips...all pieces we sanded before assembling.  we glued each piece in place for added strength & durability & of course, we pre-drilled.   each 2x2 cross bar has 2 screws, vs one to keep them from turning. (this i learned when building the chicken tractors.)

we sealed the wood with a beeswax polish to help being a bit of shine to it & protect the wood as well.

all in all i am pleased.  it is a super stable design, though i do wish we would have had better wood on hand.  it'll do though donkey...;)

Thursday, July 7, 2011

update on the chicken tractor...;)

so, the plan was to cut the coop in half  & make our third tractor.  well, it totally worked!  it didn't take long either, just a bit of planning here & there.  i wound up gutting the coop first thing.  then with just the frame in front of me, i would cut a board or two in half, add the supporting side bits & move along to the next chunk. 
ira (the neighbor who i bought this coop from) added a couple of 2x4x12's in to the deal (thank you!!!) as well.  between that, the plywood that we had leftover from replacing a bit of our bathroom floor &  the wood from the coop that i was able to re purpose....i was able top keep the total cost under $50.  i had to make one trip to lowes, & figure i spent $10 tops on latches, wheel bolts, washers & hooks. 
this is a side view.  the ramp, sliding door are on the right...the two doors on the back are for cleaning & food/water.
a view into the coop/cleaning door.  you might notice there are no nesting boxes.  i didn't bother with them in this tractor.  why??  well, other 2 tractors have them, but the hens lay their eggs anywhere & everywhere in the coop.  i still need to add a roosting branch.

this door is also for my cleaning the coop out...easy access, you know.
this is the food/water access door.  i put it under the coop this go round.  the other tractors have them hanging out front, in the run section, but the food ALWAYS gets wet when it rains.  thought i'd give this a go & see if it works out better...

now a lick of paint!!  unfortunately i was so excited about getting the chicks in their coop that i forgot to paint BEFORE i added the chicken wire...

this made things just a smidge bit difficult & a whole lot messier!!

 why yes, i am covered almost entirely in paint!!  & no, it did NOT come off in the shower...;)  but i suppose that is yet another perk of being a stay-@-home mama. ;)

 this finished tractor...
we had a bit of blue outdoor paint & some white, so the paint job is a bit hodge podge.  i am in the in the process of hunting down paint leftover that we can use to personalize the coop.  the blue is a bit calm & the white, MUCH too plain!!  i have plans for a cooperative collage with the boys & i &  whoever else happens to stop by on painting day...
side view...
but the chicks are absolutely LOVING it & that is what really matters, right??
 it was funny seeing them take their first steps on the grass, just little toddlers...

but growing ever so fast!!


and what or your "little ones"??